Onn 70 Inch TV Manual
Onn ROKU TV Manual
Onn TV Quick Start Guides

Onn TV Manual
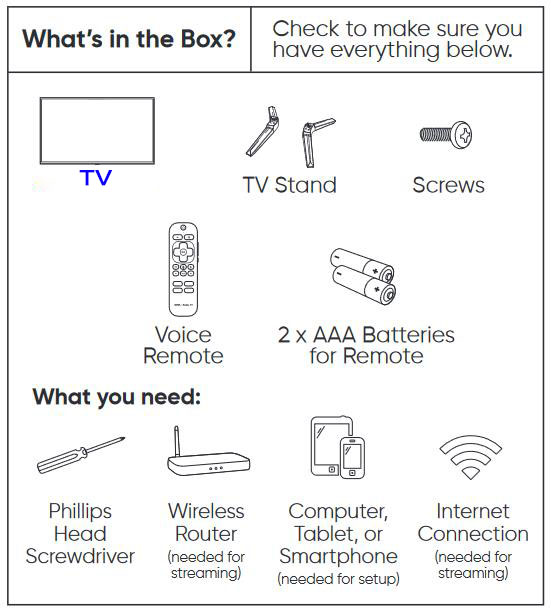
What’s in the Box?
- Check to make sure you have everything below.
- TV Stand
- Screws
- Voice
- 2 x AAA Batteries
- Remote
- for Remote
- What you need:
- Phillips Head Screwdriver
- Wireless Router (needed for streaming)
- Computer, Tablet,or Smartphone (needed for setup)
- Internet Connection (needed for streaming)
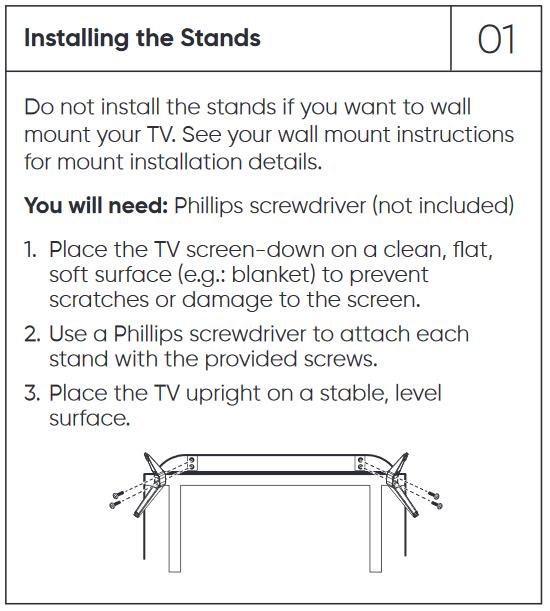
Installing the Stands
- Do not install the stands if you want to wall
- mount your TV.See your wall mount instructions for mount installation details.
- You will need:Phillips screwdriver(not included)
- 1.Place the TV screen-down on a clean,flat, soft surface (e.g.:blanket)to prevent scratches or damage to the screen.
- 2.Use a Phillips screwdriver to attach each stand with the provided screws.
- 3.Place the TV upright on a stable,level surface.
Grab your Voice Remote
Power your TV remote by inserting the included batteries carefully matching (+)and
(-)indicated inside the battery compartment.
A Power
B Back
C Directional keypad
D Channel recall
E Rewind
F Voice
G Microphone
H Home
I Volume
J View more options
K Fast forward
onn.·Roku TV
L Play/Pause
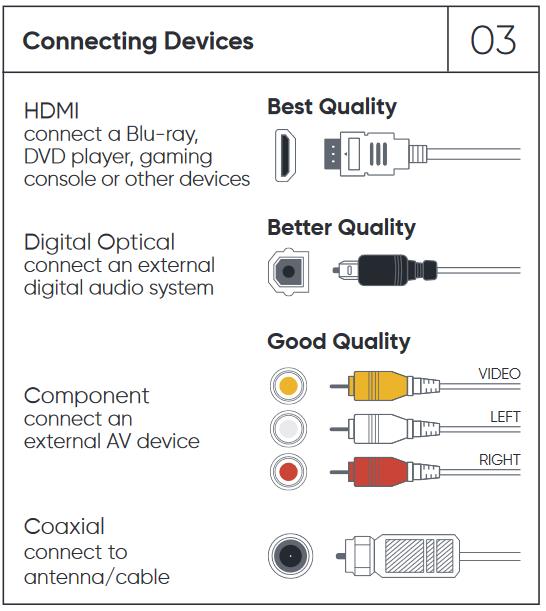
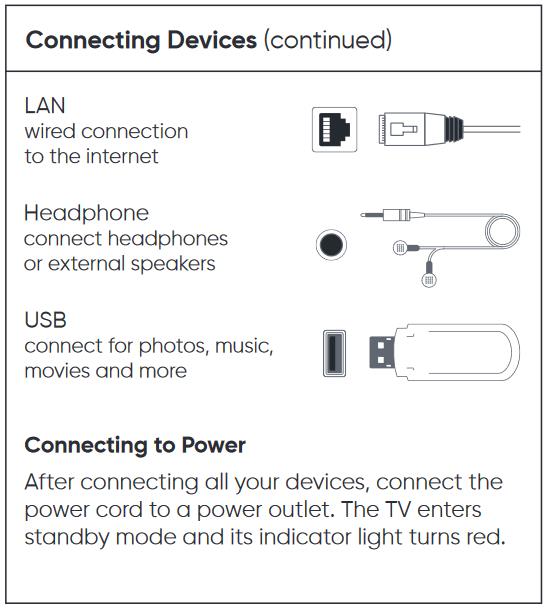
Connecting Devices
HDMI
Best Quality
connect a Blu-ray, DVD player,gaming console or other devices
Better Quality
Digital Optical
connect an external digital audio system
Good Quality
VIDEO LEFT RIGHT
Component connect an external AV device
Coaxial connect to antenna/cable
Setup Activation
Tip:Have your wireless network name and password handy.
Follow the on-screen instructions on your onn.”.Roku TV.If you aren’t ready to connect your TV to a wireless network,you can still use it as a regular TV.
Activate your onn.”.Roku TV using your computer,smartphone,or tablet to link to a Roku account.You need a Roku account to activate your onn.”.Roku TV and access entertainment across thousands of
streaming channels.
Note:Roku doesn’t charge for activation support-beware of scams.
Onn TV Guided Setup
Insert batteries in the remote control
- Your Roku TV remote control comes with a pair of matched batteries of the proper size. Open the back cover of the remote control and insert the batteries, observing the correct polarity as indicated inside the battery compartment.
- Reattach the back cover.
Turn on the TV
- The standby indicator light below the TV screen should be ON, indicating that the TV has power.
- Press Power on your Roku TV remote control. The standby indicator light will go OFF, and a moment later, you will see the TV’s startup screen. After a short wait, the first Guided Setup screen appears.
- Note: If you want to use the text-to-speech screen reader, press Star four times quickly. The screen reader is only available in English.
Choose a language
- When your Roku TV powers on, the first screen will allow you to choose a language. All text and dialog within the Roku application will be displayed in the selected language.
- Scroll up and down the list and press OK on your Roku TV remote to choose a language.
- Note: It is the responsibility of the channel publisher to translate their channel and some channels may not support your chosen language.
Select a country
- To make sure your TV has all features available in your country, select the country where you are using the TV.
Select home use
- Unless you are setting up your Roku TV for use as a store display, select Set up for home use.
Connect your Roku TV to your network and the internet
- Choose your wireless network from the list of available networks and enter your password. This is most often the same network you use to connect your computer or smartphone to the internet. If at first you do not see your network, select Scan again to see all networks. For more assistance, see help finding your wireless network and password.
- If you want to see your password as you type, choose Show password. This can help prevent entering the wrong password. Remember, passwords are case-sensitive. Use the shift button on the on-screen keyboard to enter a capital letter.
- Once you enter your password and select Connect, your Roku TV will automatically connect to your network and the internet. Alternatively, you can get more help if you are unable to connect to your wireless network or the internet.
Download the latest software
- Once connected to the internet, your Roku TV will download the latest version of Roku OS software and then reboot.
Create a Roku account and activate your Roku TV
- To activate your Roku TV, it must be linked to a Roku account. Your Roku account stores information on which devices you own, and which channels you have installed, as well as your preferences and settings.
- Note: There is NEVER a charge to create a Roku account.
- When prompted on screen, enter a valid email address to use for your Roku account, and then switch to your computer or smartphone to activate and link your Roku TV. Be aware that it may take a few moments to receive the activation email from Roku. If you do not see it in your email inbox, be sure to check your spam (or junk) folder. If you cannot get your Roku TV activated, learn how to resolve linking issues.
- Note: Roku does not require an activation fee, or charge for support of any kind. Learn how to avoid fraudulent websites.
Connect your devices
- At this point, Guided Setup should be on the Let’s connect your devices screen.
- If you have not already done so, connect your devices, such as your cable box, game console, Blu-ray or DVD player, or VCR. If you are using your Roku TV with a soundbar or home theater receiver, connect these as well. Refer to the quick start guide for details.
- Turn on all of your connected devices. Your Roku TV can detect certain kinds of devices, so it prompts you to turn them on before proceeding. When you’re ready, select Everything is plugged in and turned on, and then follow the simple prompts to complete this step for each input.
- Press OK , and then press it again to confirm that everything is plugged in and turned on.
- Guided Setup asks you to assign a name and icon to the device connected to the first input. You can select from a preselected drop down menu or select Set custom name & icon to customize the input name and choose from an icon menu. After a few seconds, the screen also displays a small window showing the program playing on the device connected to the input, if any. Use the Up and Down arrow buttons to scroll through the list, and then press OK to make your selection.
- Tip: Select nothing if you are not using the input and you want to hide it so that it does not appear on the Home screen.
- Repeat this step for each input until you reach the All done screen.
- Note: At this point, your TV might play a welcome video. To skip the welcome video, press Home .
Optional – connecting an antenna?
- This step is not part of Guided Setup, and applies only if you are using the Live TV input. If you have a set-top box from a cable TV provider or satellite TV, you’ll most likely connect it to one of your TV’s HDMI® inputs, and never need to use the Live TV input.
- The first time you select the Live TV tile on the Home screen, the TV prompts you to scan for channels. Just follow the instructions on the screen to complete this step, and then you’ll be able to watch your local broadcast or non-scrambled cable channels.
You’re finished!
- You’re now ready to start watching your favorite shows.
onn television troubleshooting
smart tv onn manual
onn tv user manual
onn roku tv manual español
onn tv guide
manual for onn roku tv
onn roku tv instructions
ONN 100012588 manual
onn roku tv owners manual